2015年8月18日 星期二

Enlarge Openfire Heap Size


https://community.igniterealtime.org/docs/DOC-1033

Heap Settings

Add "-Xms32m -Xmx128m -Xss128k -Xoss128k -XX:ThreadStackSize=128" to INSTALL4J_ADD_VM_PARAMS to specify an initial heap of 32 MB, a maximum heap of 128 MB and a stack size of 128 kB for native and java threads. Do not append a k to the ThreadStackSize value.

One may also need to set "-XX:MaxPermSize=128m", but before doing this one should consult the gc.log file.

如果是以tar方式安裝,則編輯bin底下的openfire script, 裡面有一行INSTALL4J_ADD_VM_PARAMS, 取消# mark, 並且在等號後加上類似這樣的設定值"-Xms32m -Xmx128m -Xss128k -Xoss128k -XX:ThreadStackSize=128", 規則如官網文件所述,不再描述, 設定完成重啟!

轉貼請註明出處,最好直接使用聯結轉貼!Thanks~
作者: Samuel Lin
Blog:http://sabaothtech.blogspot.tw/
日期:2015/08/18

2015年8月17日 星期一

Openfire - Smack - TLS設定 全面講解


對於XMPP Openfire, Smack, AWS加乘下, 設定安全通道眾多問題, 故一次整理, 希望大家別再花費龐大時間研究驗證.

文中內文適用任何使用Smack Lib的平台, 例如: Server, Android等…

GitHub code: https://github.com/samuel1114/Openfire_TLS

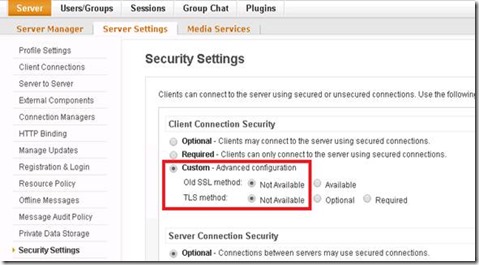
1. Openfire不管是TLS還是一般未加密通道, 一律使用5222 Port,

任何文件上或Console上的5223 Port是針對Old SSL Version, 所以不需要開放5223 Port.

2. Smack在4.1.0版本後參數設定以及寫法, 與之前版本及aSmack差異較多, 故本文所使用的會是4.1.0之後版本(這樣才有意義, 網路上資源較少).

3. 一般來說Openfire Admin Console未加密是9090 Port, 加密是9091 Port.

4. 不管是Openfire Admin Console或者是一般XMPP使用TLS連線, 在Server Settings ==> Server Certificates需要有憑證設定(CA認證或者Self Signed).

5. 首先先來說明, 如果單純在Openfire設定憑證, 那Smack該如何建立連線,

….

XMPPTCPConnectionConfiguration.Builder config = XMPPTCPConnectionConfiguration.builder()

       .setSecurityMode(ConnectionConfiguration.SecurityMode.required)

        .setCustomSSLContext(HTTPSTrustManager.getSSLContextAllowAll())

        ……

以上可以發現, 我們必須要在Configuration設定成required, 並且透過setCustomSSLContext設定SSLContext,

範例上是採用接受所有憑證, 如果要更加強安全性, 建議直接指定憑證, HTTPSTrustManager裡有相關範例.

※TLS/SSL流程及SSLContext或SocketFactory為何, 不在本文說明範圍內.


6. 如果是直接在AWS的ELB上設定憑證, 這樣該如何建立?

如果在ELB上設定5222 Port憑證, 我們只需要先確定我們能夠與ELB先建立起安全通道,

而ELB到Openfire則不需要有任何安全通道的建立, 如此則需要使用不一樣寫法:

XMPPTCPConnectionConfiguration.Builder config = XMPPTCPConnectionConfiguration.builder()

       .setSecurityMode(ConnectionConfiguration.SecurityMode.disabled)

        .setSocketFactory(HTTPSTrustManager.getSSLContextAllowAll().getSocketFactory())

        ……

以上可以發現, 我們必須要將Configuration設定成disabled, 而必須透過setSocketFactory設定憑證,

使其可以與ELB建立起安全通道, 範例上是採用接受所有憑證,

如果要更加強安全性, 建議直接指定憑證, HTTPSTrustManager裡有相關範例. 

※請注意, 一但設定在ELB上, 則唯一的連線方式就是TLS, 不能使用未加密通道.

但也正如此, 我們必須將Openfire進行以下設定, 否則ELB與Openfire會有斷線問題.
clip_image002


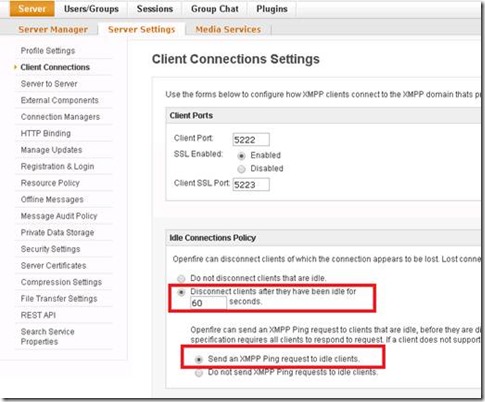
7. 前端可能會因為各種因素, 導致與Openfire連線在很短時間內很常發生斷線問題,

故我們可以在Openfire上進行以下設定, 確保與Openfire之間的連線
clip_image003


8. 另外為了避免Exception in thread "main" SASL authentication failed using mechanism DIGEST-MD5

(Openfire Bug)

(1)在Openfire上需要增加Server Properties: sasl.mechs將其設定為PLAIN.

(2)Smack則需要特別指名sasl mechs

……

SASLAuthentication.unBlacklistSASLMechanism(SASLMechanism.PLAIN);

SASLAuthentication.blacklistSASLMechanism(SASLMechanism.DIGESTMD5);

SASLAuthentication.blacklistSASLMechanism(SASLMechanism.CRAMMD5);

SASLAuthentication.blacklistSASLMechanism(SASLMechanism.EXTERNAL);

SASLAuthentication.blacklistSASLMechanism(SASLMechanism.GSSAPI);

……

9. 如果在ELB上使用了域名, 並設定憑證, 例如:openfire.sabaothtech.com, 則在Openfire上的Server Name最好也是一樣叫openfire.sabaothtech.com, 並且其Server Properites的xmpp.fqdn, xmpp.domain也是要設定成openfire.sabaothtech.com, 避免之後在登入後又轉成Openfire的Server Name, 簡單來說, Openfire很注重Server Name, 所以讓ELB的Domain Name與Openfire一致是最佳的選擇.

由此處即可修改Server Name, 修改完後重啟Openfire

image

轉貼請註明出處,最好直接使用聯結轉貼! Thanks~
作者: Samuel Lin
Blog:http://sabaothtech.blogspot.tw/
日期:2015/08/17

XMPP-Openfire Setup Installation Guide

Openfire安裝方式(以Ubuntu為例)
1. 前置作業
   - Open Port
     sudo ufw allow 5222(XMPP Client & TLS)
     sudo ufw allow 5223(Old SSL)
     sudo ufw allow 9090(Admin Console)
     sudo ufw allow 9091(Admin Console Security Tunnel)

   - 安裝Java Runtime(如果採用deb方式安裝)
     https://www.digitalocean.com/community/tutorials/how-to-install-java-on-ubuntu-with-apt-get
     $sudo apt-get update
     $java -version
    
     #可以選擇安裝JRE或JDK
     $sudo apt-get install default-jre
     or
     $sudo apt-get install default-jdk
    
     #也可以選擇安裝Oracle JDK
     $sudo apt-get install python-software-properties
     $sudo add-apt-repository ppa:webupd8team/java
     $sudo apt-get update
     $sudo apt-get install oracle-java7-installer
    
     #設定要那一個JRE為Default
     $sudo update-alternatives --config java
    
     #設定JAVA_HOME環境變數
     $sudo nano /etc/environment
    
     #加入此行
     JAVA_HOME="YOUR_PATH"
     $source /etc/environment
     $echo $JAVA_HOME

2. tar檔
    https://www.linode.com/docs/applications/messaging/instant-messaging-services-with-openfire-on-ubuntu-12-04-lts-precise-pangolin

   - 將openfire.tar放到/opt底下, 並解壓
     $ tar xvf openfire.tar

   - Link service
     ln -s /opt/openfire/bin/openfire /etc/init.d/

   - Start Service
     service openfire stop
     service openfire start

   - 進入Admin Console設定
     http://x.x.x.x:9090
     default Account/Password: admin/admin

3. deb檔(此方法反而較為複雜, 並且最好有root權限)
   - 將openfire.deb放到/opt底下

   - 執行安裝, 請一定要安裝JRE, 並且一定要設定JAVA_HOME.
     $dpkg --force-all -i openfire.deb

     安裝完後安裝檔會散在以下地方
     # /etc/init.d/openfire - service script會建立
     # /etc/openfire/ - xml設定檔及security資料夾放置位置
     # /etc/default/openfire - openfire執行檔
     # /var/lib/openfire - plugins及embeded db放置位置
     # /var/log/openfire - Log directory
     # /usr/share/openfire - Link File及lib與resources資料夾

   - Start Service
     service openfire stop
     service openfire start

   - 進入Admin Console設定
     http://x.x.x.x:9090
     default Account/Password: admin/admin

   - 如何移除
     $dpkg -r openfire